


Managing Disks and Storage on a Linode
Traducciones al EspañolEstamos traduciendo nuestros guías y tutoriales al Español. Es posible que usted esté viendo una traducción generada automáticamente. Estamos trabajando con traductores profesionales para verificar las traducciones de nuestro sitio web. Este proyecto es un trabajo en curso.
Understanding Storage
Every Linode is equipped with persistent storage, the amount of which varies based on size and type of the Linode’s plan. This local storage is built entirely on enterprise-grade SSDs (solid state disks) and is very performant.
Disks
A Linode’s storage space can be allocated to individual disks. Disks can be used to store any data, including the operating system, applications, and files. Most Linodes will come equipped with two disks. A large primary disk is used to store the Linux distribution, software, and data. There’s also a much smaller swap disk, which is used in the event that your Linode runs out of memory.
While two disks may be the default, a Linode can be configured to have many more disks. These additional disks can serve a variety of purposes, including dedicated file storage or switching between entirely different Linux distributions. When multiple disks are added to a Linode, configuration profiles are used to determine the disks that are accessible when the Linode is powered on, as well as which of those disks serves as the primary root disk.
Adding Additional Storage
The local storage capacity of a Linode can only be increased by upgrading to a larger Linode plan. This will allow you to increase the size of a Linode’s disks or add additional disks. Block Storage Volumes can also be used to add additional storage, though these Volumes are separate from a Linode’s local disks and, for some use cases, may be less performant.
Managing Disks on a Linode
A Linode’s total storage space and disks can be viewed and managed from the Cloud Manager.
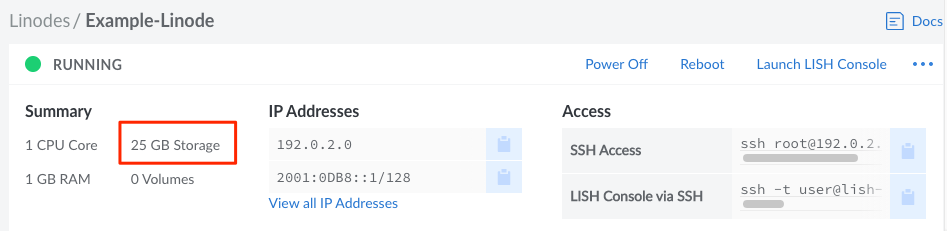
Log in to the Cloud Manager, click the Linodes link in the sidebar, and select a Linode from the list.
Look within the Summary section of the Linode’s dashboard to view the total storage.


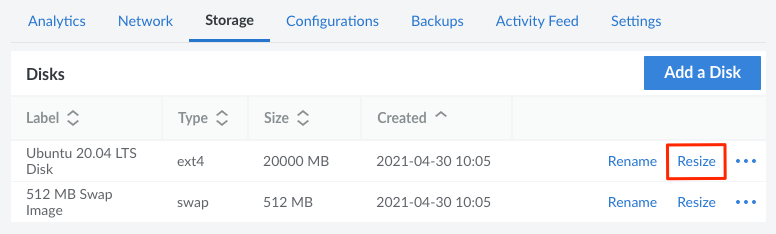
Navigate to the Storage tab to view the disks on a Linode.


From here, a disk can be created using the Add a Disk button. To take action on an disk, locate the disk within the Disks table and select from the list of actions, some or all of which may appear within the ellipsis menu:
- Rename: Change the name of the disk.
- Resize: Increase or decrease the size of the disk. See Resizing a Disk.
- Imagize: Create a Custom Image based on the disk. See Capture an Image.
- Clone: Duplicate the disk, adding it to any Linode on your account. See Cloning a Disk.
- Delete: Permanently delete’s the disk and all of its data (cannot be undone). See Deleting a Disk.
Creating a Disk
Each Linode can have multiple disks. To create a new disk, follow the instructions below.
NoteIf you wish to deploy an Image to a new disk, see the Deploy an Image to a Disk on an Existing Linode guide for complete instructions on creating the main disk, an optional swap disk, and a configuration profile.
Log in to the Cloud Manager, click the Linodes link in the sidebar, and select a Linode from the list.
On the Linode’s dashboard page, navigate to the Storage tab.
Click the Add a Disk button to show the Add Disk form. If this button is disabled, all of the Linode’s storage space has been allocated towards disks. Before continuing, resize an existing disk or upgrade the Linode to a larger plan. You’ll want to confirm there is enough unallocated storage space to accommodate the desired size of the new disk.
Select from either the Create Empty Disk or Create from Image options.
Empty disks: An empty disk can store additional data, be used as a swap disk, or it can be used to manually install a custom distribution. When creating an empty disk, select the desired Filesystem. In most cases, it’s recommended to use the ext4 filesystem. This ensures compatibility with our Backups service. If needed, ext3 and raw disks are also available. If creating a swap disk, select the swap option.
Images: Selecting an Image allows you to deploy a Distribution Image, a Custom Image, or a Recovery Image to the new disk. When creating a disk based on an Image, select the Image, Root Password, and optionally add SSH Keys.
Once an option is chosen, complete the remaining fields in the form. Enter the Label and the Size for the new disk. The maximum size of the disk is pre-populated and based on the Linode’s remaining storage allocation, though a smaller size can be entered if desired.
Click the Add button to create the disk. The progress can be monitored from the new entry appearing for the disk within the Linode’s Storage page.
Once a disk has been created, you will need to modify the existing configuration profile or add a new configuration profile. Specifically, the disk will need to be assigned to a device and optionally marked as the root device if this new disk will function as the primary boot disk. See the Deploy an Image to a Disk on an Existing Linode guide or the Configuration Profiles guide for additional details.
Resizing a Disk
The size of a Linode Compute Instance’s disk can be increased or decreased as needed. When resizing, it’s important to keep the following restrictions in mind:
- The maximum size of a disk is equal to the current size of the disk and the remaining unallocated storage space on the Linode. The maximum size is displayed underneath the Size field when resizing the disk.
- The minimum size of a disk is equal to the current disk usage within the filesystem. This number is not displayed in the Cloud Manager. To determine how much space the files on the disk are using, run the command
df -hwithin the Linode’s command Line (through SSH or Lish). - Raw disks can only be resized to a larger disk.
- Disks with custom partitions cannot be resized.
The following instructions cover how to resize a disk. For instructions regarding resizing a Linode Compute Instance’s plan (including downgrading to a smaller plan), see the Resizing a Linode guide.
Log in to the Cloud Manager, click the Linodes link in the sidebar, and select a Linode from the list.
Click the Power Off button in the upper right of the page or within the ellipsis menu. Before proceeding, wait until the Linode has been fully powered off.


On the Linode’s dashboard page, navigate to the Storage tab.
Within the Disks table, locate the disk you wish to resize and click the corresponding Resize button, which may also appear within the ellipsis menu.


The Resize Disk form is displayed. In the Size field, enter the new size for the disk in megabytes. The new size of the disk needs to be within the maximum and minimize disk size discussed above.
Click Resize. The progress can be monitored from the corresponding entry for the disk within the Disks table on the Linode’s Storage page.
Once the disk has been successfully resized, click the Power On button to boot up the Linode.

Cloning a Disk
A disk can be duplicated onto the same Linode or any other Linode on the account. See Cloning a Linode > Cloning to an Existing Linode for instructions.
Deleting a Disk
A disk can be deleted to remove it form the Linode and free up additional storage space that can be used for other disks.
CautionDeleting a disk is permanent and cannot be undone. Make sure all required data is properly backed up before continuing.
Log in to the Cloud Manager, click the Linodes link in the sidebar, and select a Linode from the list.
Click the Power Off button in the upper right of the page or within the ellipsis menu. Before proceeding, wait until the Linode has been fully powered off.


On the Linode’s dashboard page, navigate to the Storage tab.
Within the Disks table, locate the disk you wish to delete and click the corresponding Delete button, which may also appear within the ellipsis menu.
A confirmation dialog window will appear. Click the Delete button to confirm.
The disk will be deleted within a few seconds. Click the Power On button to boot up the Linode.

This page was originally published on