


Getting Started with Cloud Firewalls
Traducciones al EspañolEstamos traduciendo nuestros guías y tutoriales al Español. Es posible que usted esté viendo una traducción generada automáticamente. Estamos trabajando con traductores profesionales para verificar las traducciones de nuestro sitio web. Este proyecto es un trabajo en curso.
What is Linode Cloud Firewall?
Linode’s free Cloud Firewall service can be used to create, configure, and add stateful network-based firewalls to Linode services. A Cloud Firewall is independent of the service it is attached to and, therefore, you can apply a single Cloud Firewall to multiple Linode services.
Features
A Cloud Firewall analyzes traffic against a set of predefined rules at the network layer and determines if the traffic is permitted to communicate to or from the Linode Service it secures. Cloud Firewalls can be configured with an implicit deny or allow rule– they can block or allow all traffic by default and only pass through or deny network traffic that meets the parameters of the configured rules.
NoteUsers that do not have Network Helper enabled and are instead relying on a configuration that uses DHCP will need to manually allow DHCP traffic through port 67 and 68 of their Cloud Firewall. A full list of IP addresses for our DHCP servers can be found in our DHCP IP Address Reference Guide.
Inbound and Outbound Rules
A Cloud Firewall can be configured with Inbound and Outbound rules. Inbound rules limit incoming network connections to a Linode service based on the port(s) and sources you configure. Outbound rules limit the outgoing network connections coming from a Linode service based on the port(s) and destinations you configure.
Predefined Rules
The Linode Cloud Manager provides a list of predefined rules that you can add to your Cloud Firewall. The predefined rules support common networking use cases and provide an easy foundation to get started with Cloud Firewalls. Since you can edit any rule applied to a Cloud Firewall you can use the predefined rules as a foundation and further edit their configurations and also add new custom rules to your Firewall.
Add a Cloud Firewall
Log in to the Cloud Manager and select Firewalls from the navigation menu.
From the Firewalls listing page, click on the Create a Firewall link.
The Add a Firewall drawer appears with the Firewall configurations needed to add a Firewall. Configure your Firewall with at minimum the required fields:
Configuration Description Label The label is used an identifier for this Cloud Firewall. Required Linodes The Linode(s) on which to apply this Firewall. A list of all Linodes on your account are visible. You can skip this configuration if you do not yet wish to apply the Firewall to a Linode. Click on the Create button to finish creating the Cloud Firewall. By default, a new Cloud Firewall will accept all inbound and outbound connections. Custom rules can be added as needed. See Add New Cloud Firewall Rules.


Assign a Cloud Firewall to a Linode Service
Log into your Linode Cloud Manager and select Firewalls from the navigation menu.
From the Firewalls listing page, click on the Firewall that you would like to attach to a Linode. This takes you to the Firewall’s Rules page.
Click on the Linodes tab. This takes you to the Firewalls Linodes page. If the Firewall is assigned to any Linode services they are displayed on the page.
Click on the Add Linodes to Firewall link.
From the Add Linode to Firewall drawer, click on the dropdown menu and select the Linode service to which you’d like to apply this Firewall. You can also start typing the Linode service’s label to narrow down your search.
Click on the Add button to assign the Firewall to your Linode(s).
Configure Cloud Firewall Rules
Upon initial creation of a Cloud Firewall, you are required to select Firewall rules from a predefined list that supports common networking use cases. This section shows you how to add new Firewall rules to your Firewall’s existing rules, edit your Firewall’s predefined rules, and delete Firewall rules.
Add New Cloud Firewall Rules
Log in to the Cloud Manager and select Firewalls from the navigation menu.
From the Firewalls listing page, click on the Firewall that you would like to add new rules to. This takes you to the Firewall’s Rules page.
On the Rules page, select the default behavior for both inbound and outbound traffic using the Inbound Policy and Outbound Policy dropdown menus. Accept will allow all traffic except for those defined in the listed rules, and Drop will drop or deny all traffic except for those defined in the rules.


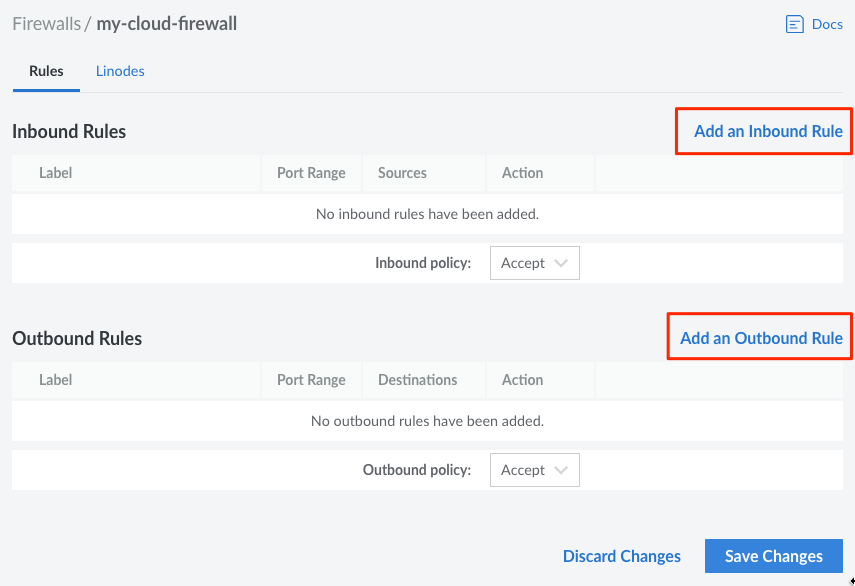
Click on the Add an Inbound/Outbound Rule link (click on the appropriate link for the type of Rule you would like to add).


The Add an Inbound/Outbound Rule drawer appears.
Provide the following Rule configurations:
Configuration Description Preset Select from a list of optional predefined Firewall rules. Selecting a predefined rule fills in the remaining Rule configuration values, however, they can all be edited. Optional Label A label for the rule being created. This is used only as an identifier for the Linode Account holder, and does not have any impact on firewall performance. Optional Description A Description of the rule being created. This is used only as an identifier for the Linode Account holder, and does not have any impact on firewall performance. Optional Protocol Select the Transport Layer protocol to use for this Firewall rule. Required Ports Select from a list of common port numbers, or select Custom to open the Custom Port Range configuration option. Up to 15 ports (and port ranges) can be added to a single Cloud Firewall rule. Port numbers must be within 1 and 65535 and they cannot contain leading zeroes. Required for TCP and UDP protocols but not allowed for the ICMP protocol. Custom Port Range Provide a port number or a range of ports on which to take action. Multiple ports or ranges can be added by separating each port or range with a comma ( ,). To configure a Port Range, enter the starting port and ending port numbers separated by a dash (-). For example, here is an example value that applies the rule to ports 21, 993, 995, and 2000-3000:21,993,995,2000-3000. OptionalSources Required for Inbound rules only. Select from a list of Sources that limit incoming connections to the chosen internet protocol, netmask, or specific IP address(es) and ranges. Destinations Required for Outbound rules only. Select from a list of Destinations that limit the outgoing connections to the chosen internet protocol, netmask, or specific IP address(es) and ranges. Action Choose whether this rule will be to allow or drop traffic. The action defined in specific rules will take precedence over the default inbound and outbound traffic policy. Required Note
When applying individual IP addresses or IP ranges to either the
sourceordestinationfield, the addresses must always be valid and formatted correctly. An example valid IPv4 and IPv6 range is as follows:139.144.0.0/162001:db8:1234::/48
As of the time of this writing, if an IP address or range is invalid, users will be unable to Save Changes after reviewing new firewall rules, and no error message will appear. Users should ensure that all IP addresses and Ranges are valid and formatted correctly should they encounter this issue.
Click on Add Rule to add the new rule to this Firewall. If you would like to add any additional rules, repeat the process outlined in this section.

When you are done adding new Firewall rules, review them on the Rules page you are redirected to by default. Firewall rules are applied in order from top to bottom as they appear on this page. If you would like to re-order these rules, drag and drop any row into their desired position.
When you are done reviewing the new Firewall rules, click on the Save Changes button on the Rules page.
Note
Any newly added rules do not take effect until you Save Changes to the Firewall.


Edit Cloud Firewall Rules
Follow the steps in this section to edit predefined and custom Firewall Rules.
Log into your Linode Cloud Manager and select Firewalls from the navigation menu.
From the Firewalls listing page, click on the Firewall whose rules you’d like to edit. This takes you to the Firewall’s Rules page.
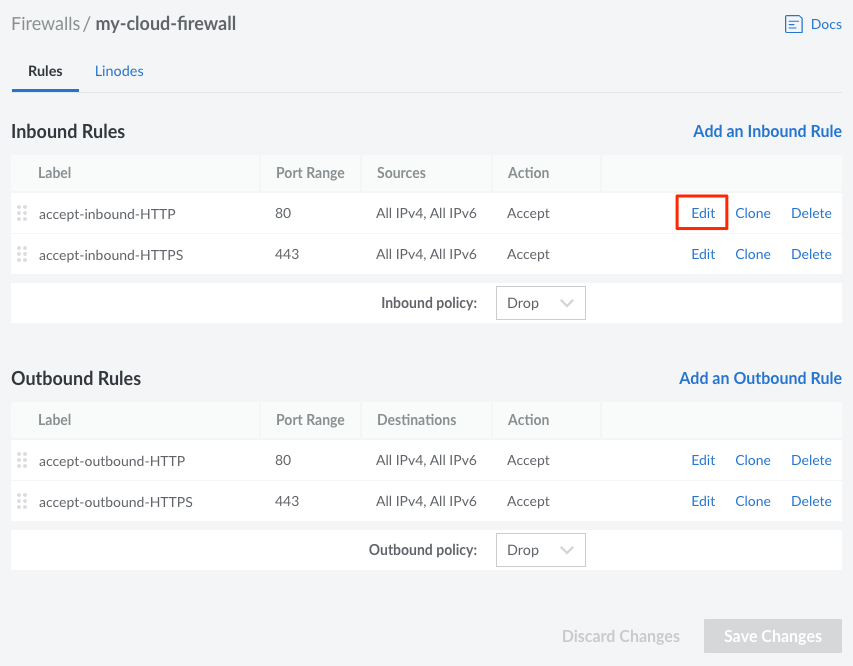
Click on the Edit button corresponding to the rule you’d like to edit.


From the Edit Rule drawer, update the rule’s configurations as needed.
Click on the Add Changes button to save your changes and apply them to the rule. If you would like to edit any additional rules, repeat the process outlined in this section.

When you are done editing your Firewall rules, click on the Save Changes button on the Rules page for those changes to take effect.


Delete Cloud Firewall Rules
Log into your Linode Cloud Manager and select Firewalls from the navigation menu.
From the Firewalls listing page, click on the Firewall whose rule(s) you’d like to delete. This takes you to the Firewall’s Rules page.
Click on the Delete corresponding to the rule that you would like to delete. If you would like to delete any additional rules, repeat the process outlined in this section.
When you are done, click on the Apply Changes button on the Rules page.
Note
Any rule deletion(s) does not take effect until you Apply Changes to the Firewall.
Update a Cloud Firewall’s Status
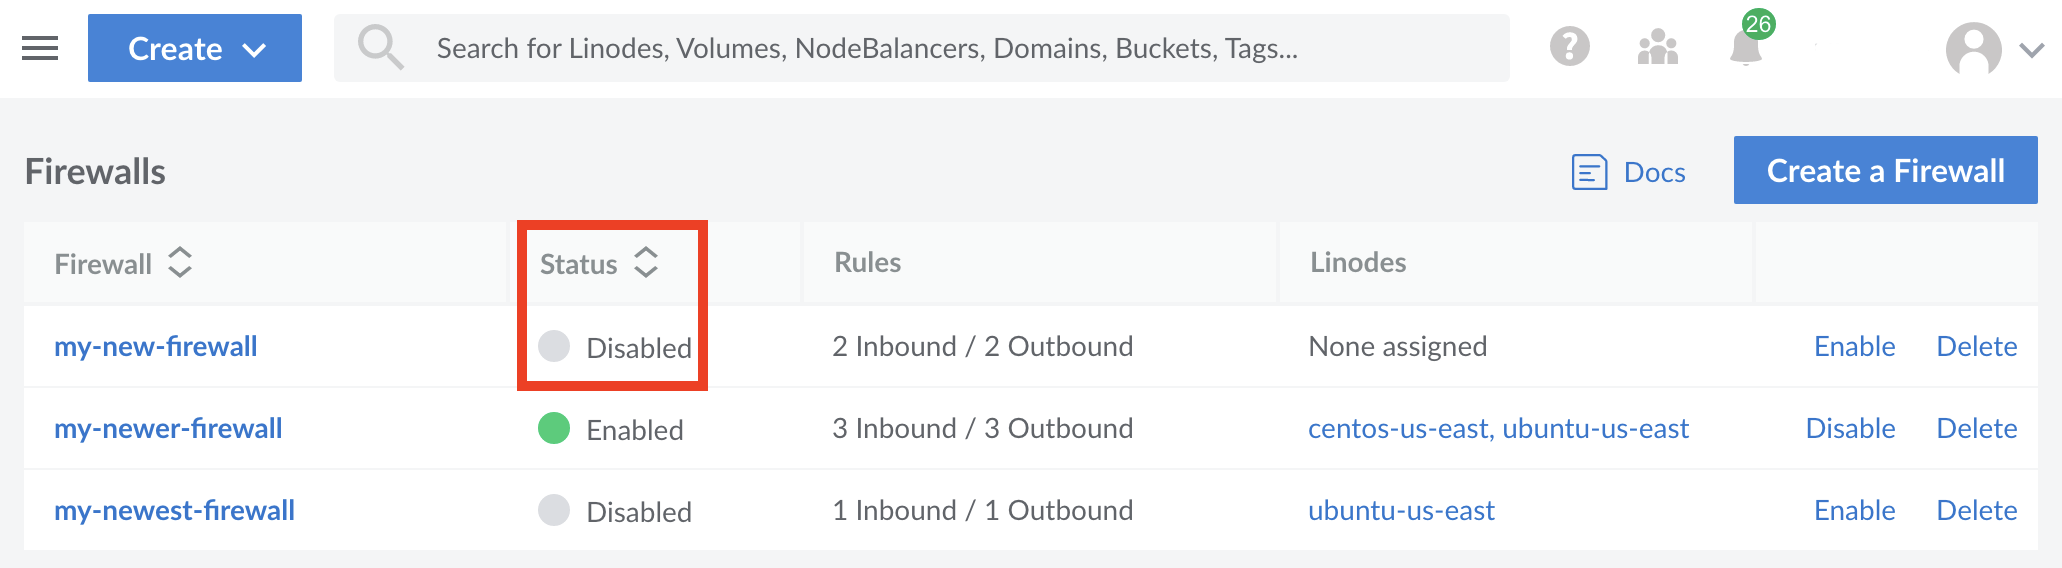
When you add a Cloud Firewall, the Firewall is enabled by default. Enabled means that the Firewall is active. If it is applied to a Linode service it filters your Linode service’s network traffic according to the Firewall’s rules. Disabling a Firewall deactivates the Firewall and it no longer filters any traffic for the Linode services it has been applied to.
Log into your Linode Cloud Manager and select Firewalls from the navigation menu. This takes you to the Firewalls listing page.
Click on the Enable/Disable button corresponding to the firewall whose status you would like to update:


The Status column on the Firewalls listing page updates to display the Firewall’s current status.


Delete a Cloud Firewall
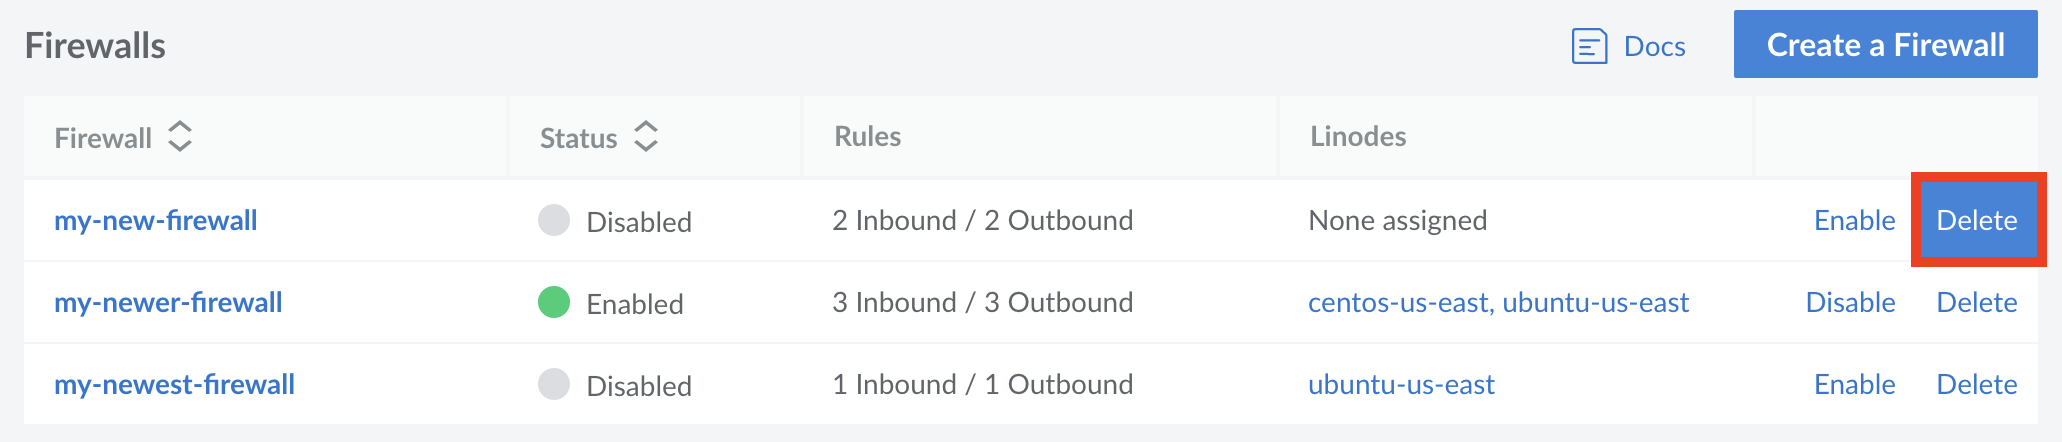
Log into your Linode Cloud Manager and select Firewalls from the navigation menu. This takes you to the Firewalls listing page.
Click on the Delete button next to the corresponding Firewall you would like to delete. You are prompted to confirm deletion of the Firewall. Click Delete to proceed.


The Firewall is deleted and any services that the Firewall was applied to no longer have their network traffic filtered by the Firewall.
Limits and Considerations
- Cloud Firewalls are compatible with all Linode Compute Instances. They are not currently supported on other Linode services, such as NodeBalancers or Object Storage.
- A Cloud Firewall can be attached to multiple Linode Compute Instances but a Linode Compute Instance can only be attached to one active (enabled) Cloud Firewall at a time.
- A maximum of 25 rules can be added to each Cloud Firewall (both Inbound and Outbound rules combined).
- A maximum of 255 IP addresses (and ranges) can be added to each Cloud Firewall rule.
- All IP addresses and IP Ranges must be formatted correctly, or changes will be unable to be saved.
- A maximum of 15 ports (and port ranges) can be defined on each Cloud Firewall rule.
This page was originally published on