


Using the Lish Console
Traducciones al EspañolEstamos traduciendo nuestros guías y tutoriales al Español. Es posible que usted esté viendo una traducción generada automáticamente. Estamos trabajando con traductores profesionales para verificar las traducciones de nuestro sitio web. Este proyecto es un trabajo en curso.
The Lish Console, also called the Linode Shell, provides direct console access to all of your Compute Instances. Through Lish, you can easily access your Compute Instance’s internal Linux system and run commands, install software, or configure applications. Lish is especially useful when you are not able to connect to your server through other means, such as SSH.
Accessing Lish
There are two ways to access Lish. You can use a terminal application to connect to a Lish SSH gateway, or you can log in to the Linode Cloud Manager and use the Lish console in your web browser. This section explains both methods.
NoteLish used to be accessible via a direct SSH connection to your Linode’s host machine, but as of May 10, 2013, all users must connect to a Lish SSH gateway to access Lish. For more information, please see this blog post.
Through the Cloud Manager (Weblish)
You can connect to Lish using a web browser. This is useful when you don’t have access to a terminal application, or if you just need quick and easy console access from the Cloud Manager.
Log in to the Cloud Manager.
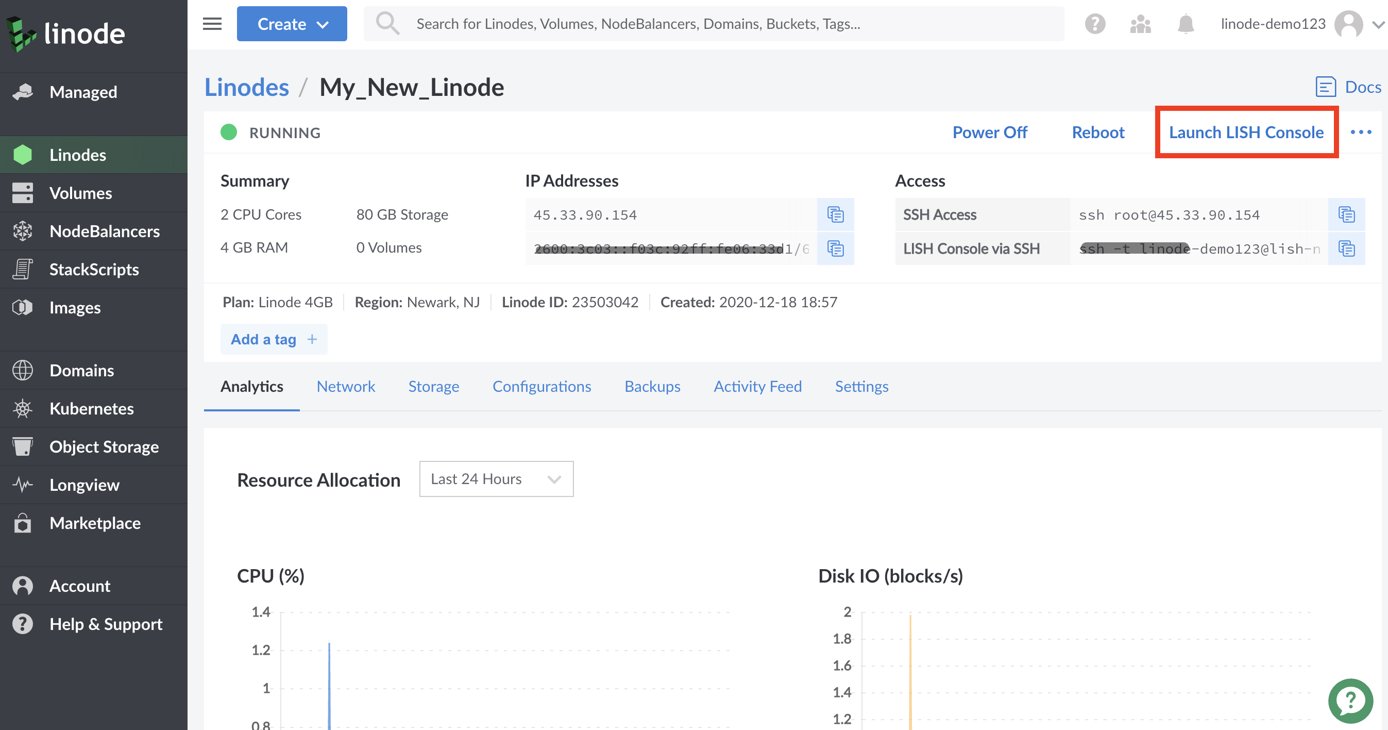
Click on the Linodes link in the sidebar and select the desired Compute Instance.
Click on the Launch LISH Console link in the top right-hand corner of the Cloud Manager.


The Lish Web Console window appears, as shown below.


From here, you can log in to your Compute Instance with any other username and password available on that system (such as
root)
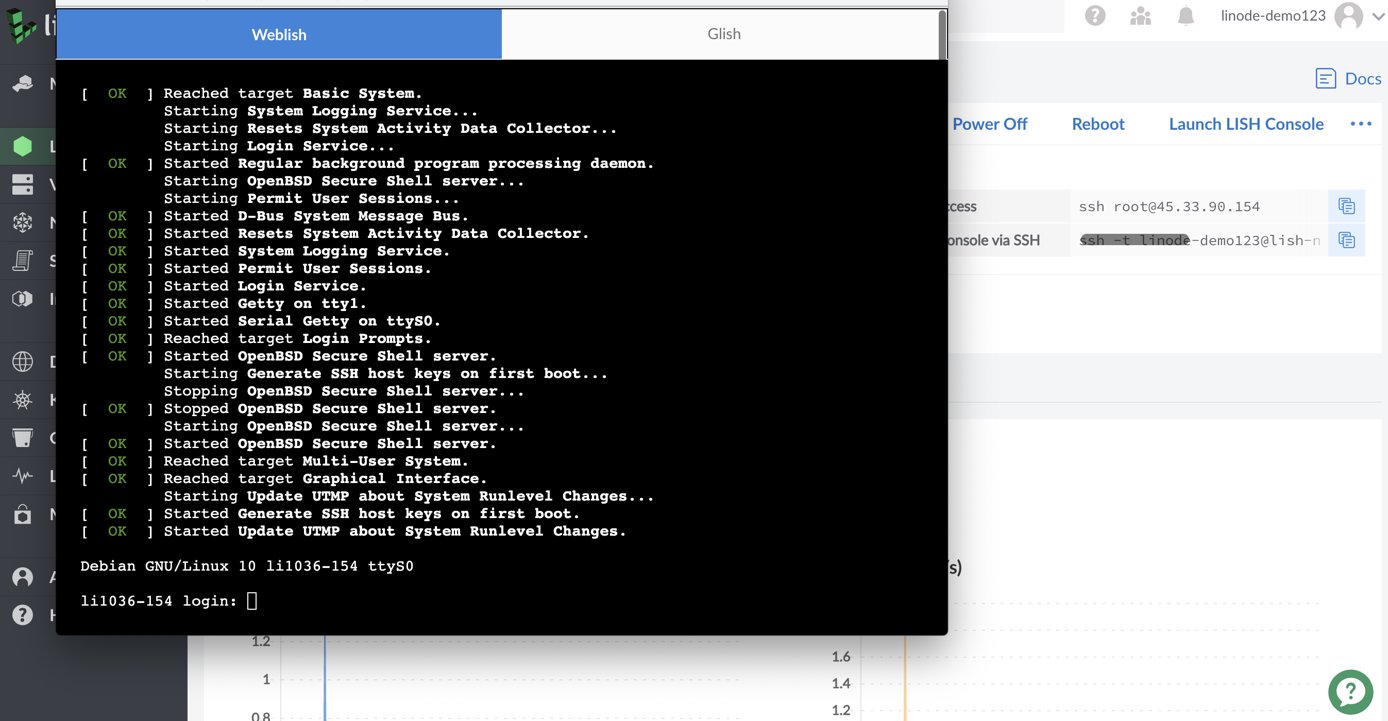
You can exit to the Lish prompt by pressing CTRL+A then D. You cannot exit to a Lish gateway box using your web browser. To exit the session entirely, just close the Lish Web Console window.
Through SSH (Using a Terminal)
You can connect to Lish with the SSH client of your choice. For example, you can use the Terminal application in Mac OS X, PuTTY in Windows, or your favorite X11 terminal emulator.
NoteIf you have Third Party Authentication enabled on your account, you will not be able to log in to your Compute Instance through Lish with password authentication, and must instead use SSH key authentication. Read the Add Your Public Key section for more instructions on how to add an SSH key to your account for use with Lish.
Select a Lish SSH gateway. There’s one in every data center. You can use any gateway to access your Compute Instances, but we recommend using one close to the data center it’s located within. The gateway boxes are available over IPv4 and IPv6.
Lish SSH gateway Data Center lish-atlanta.linode.comUS, Atlanta, GA lish-dallas.linode.comUS, Dallas, TX lish-fremont.linode.comUS, Fremont, CA lish-newark.linode.comUS, Newark, NJ lish-mum1.linode.comMumbai, India lish-singapore.linode.comAsia, Singapore, SG lish-syd1.linode.comSydney, Australia lish-tokyo2.linode.comorlish-shg1.linode.comAsia, Tokyo, JP lish-tor1.linode.comCanada, Toronto, ON lish-frankfurt.linode.comEurope, Frankfurt, DE lish-london.linode.comEurope, London, UK Open a terminal window and enter the following command, replacing
usernamewith your Cloud Manager username, andlocationwith your preferred Lish SSH gateway. Lish listens for connections on ports 22, 443, and 2200.ssh username@locationFor example, logging in as
uservia the Newark gateway would look like:ssh user@lish-newark.linode.comNote
Users who have been granted “Access” rights on a particular Compute Instance will have access to its Lish console via the gateway. Linodes that a user can’t access in the Cloud Manager won’t show up in the Lish list. For more information about creating user accounts and configuring permissions, see Accounts and Passwords.Verify that the Lish SSH gateway’s fingerprint is valid by verifying the Terminal’s output against the list of our Lish Gateway Fingerprints. Once verified, enter yes to proceed.
The authenticity of host 'lish-newark.linode.com (66.228.40.59)' can't be established. ECDSA key fingerprint is SHA256:57OGBNARJ1fhI+zrE3eTEeQWXVVDHRU8QHcP+BsWmN8. Are you sure you want to continue connecting (yes/no)?If after verifying the authenticity of the Lish SSH gateway’s fingerprint, you receive a message indicating that the ECDSA host key differs from the key for the IP address, remove the cached IP address on your local machine. Ensure you replace
192.0.2.0with the IP address indicated by the Terminal.ssh-keygen -R 192.0.2.0Once you have removed the cached IP address, you can again attempt to SSH into the Lish gateway.
If after verifying the authenticity of the Lish SSH gateway’s fingerprint, you receive a …
Enter the password you use to log in to the Cloud Manager. You are now at the Lish shell. A list of your Compute Instances appears, as shown below:
Linodes located in this data center: linode241706 Newark, NJ linode276072 Newark, NJ Linodes located in other data centers: linode287497 Dallas, TXNote
You can add a public SSH key for Lish in the Cloud Manager to automatically connect to Lish without a password. See this section for more information.At the Lish command prompt, type a Compute Instance’s name from the list. For example, typing
linode241706will connect you to the screen console session for that Instance.Log in to the system with your username and password.
After you log in, you’ll have console access to your Compute Instance. You’ll be able to restart services like sshd, edit firewall settings, and make other changes. To exit the console, press CTRL+A then D to return to the host machine, and then press CTRL+D to return to the Lish menu. If you’d like to see the list of your Compute Instances again, type list from the gateway.
Add Your Public Key
If you don’t want to enter your password every time you connect to Lish, or if you have Third Party Authentication enabled on your account, you can add your public SSH key to the Linode Cloud Manager. If you haven’t yet created SSH keys, please see our Public Key Authentication with SSH guide for more information.
Log in to the Cloud Manager.
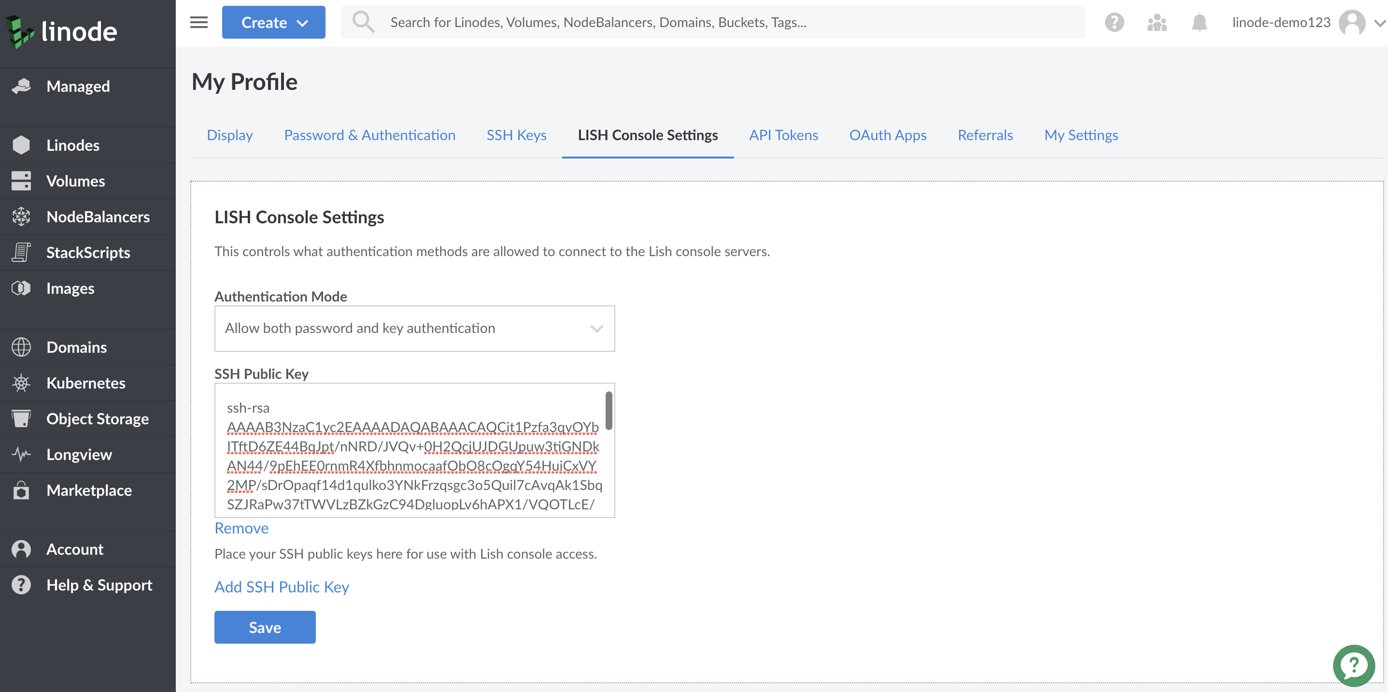
Click on the profile icon in the top right hand corner of the Manager and select LISH Console Settings.
Copy your public SSH key into the SSH Public Key field, as shown below.


Click the Save button. Your Lish key will be saved in the Cloud Manager.
Now you can log in to any of the Lish gateway boxes without having to type your password.
If you wish to disable Lish access for users without keys, use the Authentication Mode dropdown menu on the same page, and select Allow key authentication only then click Save.
Understanding Lish Commands
The Lish shell provides access to many functions which are otherwise only accessible via the Cloud Manager web-based administration tool. Enter the help command to see a full list of available commands. The output provides an introduction to Lish functionality:
kill            - kill stuck screen sessions
exit            - exit from lish
help            - this menu

[return]        - connect to console
version         - display running kernel version
boot            - boot last used (or the only) config profile
boot N          - boot the specified config profile
shutdown        - shut down the Linode
reboot          - shut down, then boot the last used config profile
reboot N        - shut down, then boot the specified config profile
sysrq X         - send SysRq X to your Linode
destroy         - pulls the plug on a running Linode, no fs sync, no warning

jobs            - view the job queue for your Linode
configs         - view the configuration profiles for your Linode
config N        - view configuration profile details for profile N
status          - view the status of your Linode
logview         - view contents of console log
There are two ways to run these commands for a specific Compute Instance. If you are at the main Lish gateway, you can prefix the command with a ID, like this:
linode123456 logview
You can also bring up the Compute Instance’s console, then type CTRL+A then D to drop back to the host for that Instance. Now all of the commands above will be run for that Instance specifically. To exit back to the main Lish menu, type exit.
NoteYou can activate the ability to scroll back through the Lish console by pressing CTRL-A + ESC
Advanced Lish Tricks
While the Lish interface as described above is useful as a basic command-line interface, you may find that you want to issue commands to your Compute Instance without going through the Lish login process.
You can directly connect to a Compute Instance’s console:
ssh -t [manager-username]@lish-[location].linode.com [linode-name]
You can also append Lish commands to the SSH command on your system prompt. For instance, to reboot your system, using your Cloud Manager username, location, and the host-id for your Compute Instance:
ssh -t [manager-username]@lish-[location].linode.com [linode-name] reboot
Similarly, you can generate a view of the log using Lish:
ssh -t [manager-username]@lish-[location].linode.com [linode-name] logview
This command format works for all Lish functionality.
Lish Gateway Fingerprints
The valid fingerprints for the Lish gateway boxes are as follows:
Atlanta
These are the fingerprints for the Lish gateway in our Atlanta data center (lish-atlanta.linode.com):
RSA 59:30:1a:0b:93:5e:3f:4b:6f:d1:96:ff:7e:9e:12:f8
ECDSA SHA256:8emv5PuUgPB2GFejMYWl1f4x1yj3YqAQPAYIrBm43ZI
Ed25519 SHA256:7k2c442k+zqbGaraZvmqXM3MA5lCcthaR2lbrB651lg
Ed25519 MD5:b3:76:56:3a:d8:66:5e:0c:61:90:03:b7:0b:ca:58:25
Dallas
These are the fingerprints for the Lish gateway in our Dallas data center (lish-dallas.linode.com):
RSA 6d:3d:b5:d0:42:1c:49:45:a6:47:29:bd:88:4e:58:d4
ECDSA SHA256:1fL1HTGas1APIpshCu1ZWys7LI97s8eTFN3+f8zEYXA
Ed25519 SHA256:Ime9h7IAxAjBvMGR+G+EnbaLWpvXO+Z7TaGHzM9g5Sc
Ed25519 MD5:23:c1:02:ba:40:77:f7:73:0b:d4:0f:3a:f1:8c:74:b6
Frankfurt
These are the fingerprints for the Lish gateway in our Frankfurt data center (lish-frankfurt.linode.com):
RSA 43:76:22:43:0e:01:cb:84:6a:80:b9:9b:90:34:c7:b1
ECDSA SHA256:e1FxEXiZVi6n13tagd1ZAQEW/fsRqz29ez5IfWf9kxg
Ed25519 SHA256:vG1rnoGe7XRRY0nauJREQk75OamxCwRRpeaTDB8LpgM
Ed25519 MD5:9e:83:86:e2:f9:f7:f7:56:fc:bf:54:bb:75:7e:79:37
Fremont
These are the fingerprints for the Lish gateway in our Fremont data center (lish-fremont.linode.com):
RSA 2c:43:0e:fc:88:f2:3a:dd:01:43:3a:fc:9f:67:9f:66
ECDSA SHA256:fwuaKryHbvtKjFFviDocnMTNKWXUzfZSGPY8mgLgiNM
Ed25519 SHA256:s3MVXFaTiL7Fb5oB0s9zMBk9VJsrkNxXXZfdeJG2enQ
Ed25519 MD5:c8:eb:9d:e6:b0:60:b1:ca:9e:89:d1:e4:6a:3c:10:31
London
These are the fingerprints for the Lish gateway in our London data center (lish-london.linode.com):
RSA 71:27:30:cd:dc:69:7a:fe:58:4a:04:e6:6b:5f:b4:e2
ECDSA SHA256:mE/plOHLl+NJ7LUdW7AaMEOnhskXZxav5Em/rD6VZ5g
Ed25519 SHA256:HXHM8/wCx7NrGsnfGpaexiBfOLKN9g0hoaL9wRaSeWg
Ed25519 MD5:c1:43:45:93:d6:96:4e:50:41:d2:d0:9f:81:e5:f8:9e
Mumbai
These are the fingerprints for the Lish gateway in our Mumbai data center (lish-mum1.linode.com):
RSA 57:72:e0:79:a6:48:13:2b:8a:cd:1e:35:7c:c1:a2:ed
ECDSA SHA256:uWVLSBPZ0E72VawrP4yWsW3YYHPM9b7A/seeEy7GG0c
Ed25519 SHA256:5VkP3/dLsfrKic9p6y9QnFq4sKa92RBzxGJrsX5/dBQ
Ed25519 MD5:e8:a7:f2:7c:5e:b3:ee:1d:bf:a3:37:68:d7:1d:b2:bf
Newark
These are the fingerprints for the Lish gateway in our Newark data center (lish-newark.linode.com):
RSA 11:2a:57:a4:f8:ca:42:b2:c0:ab:17:58:0d:0c:b7:8b
ECDSA SHA256:57OGBNARJ1fhI+zrE3eTEeQWXVVDHRU8QHcP+BsWmN8
Ed25519 SHA256:tyelNHfgaPGbN2cppfJVr/db3/pHnItR9maW+ocAS18
Ed25519 MD5:c1:f7:57:1a:09:ca:46:f8:5d:d3:d4:8a:34:6f:77:ae
Singapore
These are the fingerprints for the Lish gateway in our Singapore data center (lish-singapore.linode.com):
RSA 06:26:d8:2a:12:8b:2f:d7:6c:54:72:5a:a7:7b:da:7b
ECDSA SHA256:rFYWuld4hWMbTzX+xZMuQ3kxiJ6t8A+FNQ5k889mKEA
Ed25519 SHA256:q1G1pBrLuhsUAnZ04SOYoxVthKYyLz+wA0hBAUVkKtE
Ed25519 MD5:4c:d1:55:68:a1:90:6c:15:9b:af:c1:f7:27:31:68:29
Sydney
These are the fingerprints for the Lish gateway in our Sydney data center (lish-syd1.linode.com):
RSA 31:89:80:92:aa:c0:2f:12:f6:2d:20:3a:27:88:ea:ba
ECDSA SHA256:whZwcrXeixljj6ZrrRYzLc6UguvkNqKmtXz+JrMSI9w
Ed25519 SHA256:0lOHVxRAMMOY3HDFIE4nMz11W4y+9OYqdtFqhi8NkWs
Ed25519 MD5:ef:2d:cc:c7:aa:10:6f:cd:de:8f:c1:5d:8b:68:56:2b
Tokyo 2
These are the fingerprints for the Lish gateway in our Tokyo2 data center (lish-tokyo2.linode.com):
RSA 2c:60:9a:ce:cf:4b:8d:4e:8f:09:ae:e0:c2:b0:fb:b7
ECDSA SHA256:0sRmstQ+6lfa4KwnAIQvuZMunq8KKNmu/n4KeAcAXmg
Ed25519 SHA256:SWEV04SJt+DDG4ov2AfDYdZRavcg4GHufNP60QRkZzk
Ed25519 MD5:99:7c:4e:b3:2d:c9:79:53:a9:60:b0:40:b2:73:52:73
Toronto
These are the fingerprints for the Lish gateway in our Toronto data center (lish-tor1.linode.com):
RSA 4a:d9:fb:43:b8:0e:7f:fd:d3:cd:fc:87:06:61:51:df
ECDSA SHA256:iAWnqR3XYcooliTQ7W1tiMmjsA4k1WJVItvLz4lUxQE
Ed25519 SHA256:TSbQmRFaaWEHKEwgwvqQFKMfHKduPftou9/ue9K/Z2c
Ed25519 MD5:84:02:57:5e:b7:90:e3:78:3c:57:91:1a:e0:b4:e1:d4
This page was originally published on